
Materials
- 250 yds of Worsted Weight Yarn
- Size US H / 5.00 mm hook
Terminology
- BLO
- Back Loop Only
- BPHDC
- Back Post Half Double Crochet
- Ch
- Chain
- DC
- Double Crochet
- FPHDC
- Front Post Half Double Crochet
- FPDC
- Front Post Double Crochet
- HDC
- Half Double Crochet
- YO
- Yarn Over
- st(s)
- stitch(es)
- DC 2 TOG
- Double Crochet two Together: YO. Insert hook through stitch and pull up loop. Insert hook through next stitch and pull up loop. YO and pull through three loops on hook. YO and pull through remaining 2 loops on hook.
- FPDC 2 FPDC TOG
- Front Post Double Crochet two Front Post Double Crochet Together: YO. Insert hook around FPDC in previous row to the right. YO and pull up a loop. YO and pull through two loops on hook. YO. Insert hook through FPDC in previous round to the left. YO and pull up a loop. YO and pull through two loops on hook. YO and pull through remaining 3 loops on hook.
Notes
- The Ch 2 at the beginning of each round never counts as a stitch.
- This hat is worked in joined rounds.
Instructions
Start: Make a magic loop: wrap the yarn around your fingers twice. Insert the hook through the loop towards the side where the working yarn hangs. YO, and pull up a loop. Ch 2. Do not tighten loop.
R1: 10 DC in loop. Sl st in first DC made. Pull loop tight. (10 sts)
R2: Ch 2. DC & FPDC same st as join. DC & FPDC each st around. Sl st in first DC made. (20 sts)
R3: Ch 2. DC & FPDC same st as join. DC & FPDC each st around. Sl st in first DC made. (40 sts)
R4: Ch 2. 2 DC in same st as join. * FPDC next FPDC. DC next DC. FPDC next FPDC. 2 DC next DC.* Repeat from * to * around ending with FPDC in last FPDC. Sl st in first DC made. (50 sts)
R5: Ch 2. DC in same st as join. *FPDC 2 FPDC TOG. DC in st behind the FPDC 2 FPDC TOG just made. DC in top of FPDC. DC in next st. FPDC 2 FPDC TOG. DC in top of FPDC. DC next st.* Repeat from * to * around ending with a DC in last FPDC. Sl st in first DC made. (70 sts)
R6: Ch 2. 2 DC in same st as join. *FPDC next FPDC 2 FPDC TOG. DC next 3 sts. FPDC next FPDC 2 FPDC TOG. DC next st. 2 DC next st.* Repeat from * to * around ending with a DC in the last st. Sl st in first DC made. (80 sts)
R7: Ch 2. For this round only, the st you joined with from the previous round is crocheted last. FPDC 2 FPDC TOG. * DC st behind FPDC 2 FPDC TOG just made. DC in top of FPDC. DC 2 TOG. FPDC 2 FPDC TOG.* Repeat from * to * around ending with a DC 2 TOG with the last DC made from previous round and the same st as join. Sl st in first FPDC 2 FPDC TOG made. (80 sts)
R8: Ch 2. FPDC same st as join. *DC next 3 sts. FPDC next st.* Repeat from * to * around ending with a DC in the last 3 sts. Sl st in first FPDC made. (80 sts)
R9: Ch 2. DC in same st as join. * DC 2 TOG. FPDC 2 FPDC TOG. DC in st behind FPDC 2 FPDC TOG just made. DC in top of FPDC.* Repeat from * to * around ending on DC in st behind the final FPDC 2 FPDC TOG made. Sl st in first DC made. (80 sts)
R10: Ch 2. DC same st as join. DC next st. *FPDC next st. DC next 3 sts.* Repeat from * to * around ending with a DC in the last st. Sl st in first DC made. (80 sts)
R11+: Repeat R7 through R10 until hat reaches desired length (long enough to sit on or just above your eyebrows.) End on R7 or R9 before proceeding to Brim.
Brim
R1: Ch 2. HDC through BLO around. Sl st in first HDC made. (80 sts)
R2: Ch 2. FPHDC same sts as join and Ch 2 below. *BPHDC next sts. FPHDC next st.* Repeat from * to * around, ending on BPHDC. Sl st in first FPHDC made. (80 sts)
R3: Ch 2. FPHDC same sts as join and Ch 2 below. *BPHDC next BPHDC. FPHDC next FPHDC.* Repeat from * to * around, ending on BPHDC. Sl st in first FPHDC made. (80 sts)
R4+: Repeat R3 until brim is 1.5 inches wide. Proceed to edging.
Edging: Ch 1. Crab stitch in last stitch made in previous round: insert hook through stitch to the right (crochet backwards) of current position. YO and pull up a loop. YO and pull through all loops on hook. The end result is a twisted single crochet. Crab stitch around. Sl st in first crab stitch made. Finish off. (80 sts)

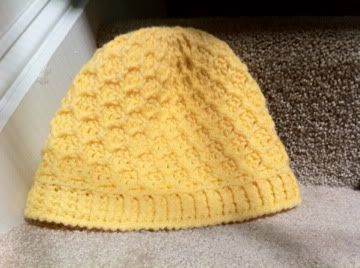
Honeycomb Beanie by Sarah Mitchell is licensed under a Creative Commons Attribution 3.0 United States License.
hello.. i came upon this pattern for a baby beanie and would really love to make one for my daughter.. but i get stuck at R7.. i was wondering if you could do a video tutorial for this beanie that i could stitch along? thanks in advance..
ReplyDeleteYou get stuck? What is tripping you up? Too few/too many stitches? Not sure how to execute a stitch? Pattern unclear?
DeleteHi Sarah! I'm working on this beanie and am having a hard time executing row 7. Can you walk through where you're supposed to put the stitches? I'm intermediate to advanced but just can't visualize what you mean here.
ReplyDeleteAlso, I've seen a photo of this hat on a man... Does it work out to a decent adult size? I didn't see any finished dimensions or sizes listed. Thanks for your help!
I could use a little help understanding how to "DC in top of FPDC" like it says in R5...I'm so stuck. Any help would be much appreciated! ^_^
ReplyDeleteNevermind, I figured it out!
DeleteWell I can't figure it out. Can someone explain?
DeleteI'm completely stuck on row 5. Do you have a diagram or video showing exactly how it's supposed to go?
ReplyDeleteI am also stuck on row 5. I am not sure where the stitch behind means. Reply to Engish.Prof.cm@gmail.com
ReplyDeleteThis comment has been removed by the author.
ReplyDeleteI’m not sure what I’m doing wrong on row 5 either. I’m ending up with 35 stitches instead of 70. Can you please explain how you’re going from 50 stitches in row 4 to 70 stitches in row 5 but you’re decreasing when you stitch the 2 front posts together.
ReplyDeleteI too, was having trouble with that, but I deleted my comment as soon as I figured out the pattern.
DeleteYou're to FPDC together around the two post stitches created in the previous row, then dc in the single stitch from the previous row that is behind the FPDC2tog you just made.
I found a similar pattern with a tutorial video which helped me out immensely:
http://www.mooglyblog.com/basics-of-the-diamond-crochet-cowl-and-fptrc2tog/
I wish there was a video tutorial of you making this hat.
ReplyDelete
ReplyDeleteI read this article. I think You put a lot of effort to create this article. I appreciate your work.
Click Here : 2005 Cat 140H (1312) w/7895 Hrs For Sale at $108k